----------------------------------------------- Blogger Template Style Name: Awesome Inc. Designer: Tina Chen URL: tinachen.org ----------------------------------------------- */
Showing posts with label FACEBOOK TRICKS. Show all posts

Tuesday, 17 June 2014

HOW TO MAKE FACEBOOK FREINDS FROM DIFFRENT COUNTRIES

Facebook is the largest medium to get connected to your Friends, Relatives, and also people from all over the world, i.e. people from different countries.
What you do is simply send a Friend request, get it accepted (in most cases) and you start communicating with that person. Meanwhile, you get to know about some interesting things about people living in that country, their behavior, most importantly, their Friendship. 
Friendship is that bond which can even connect people from overseas. All thanks to Facebook and its Team which works heartily to connect people.

Now let's get started to make bonds with people from different countries......   

Step 1.
Log in to your Facebook account. 


Step 2.
Second  thing we have to do is, to type the Name of that country in the search box, whose people you want to become friends with.


You will get the list . Click on any one of the top 4 links .


Step 3.
Then click on the link " people who likes it"


You will get the list of people who likes it.


 Step 4.
You are likely to get many users who belong to that Country/City who likes it. 
Click on the name of any one person. 
If you don not find people from that country then Click on Current city option, Select any city related to your search's country, or any other city in Foreign country.

Step 5.
After finding a person, send him friend request. 
Make more friends by viewing his friend list and sending Friend requests to other people also.

         
  Another way                                                


Type the 
name of a famous city of that country instead of that country  like Barcelona of Spain.


Then follow the same procedure.

how to create scary facebook status

WANT TO MAKE A SCARY FACEBOOK STATUS TO FRIGHTENED UR FREINDS . IT IS VERY EASY TO UPDATE A SCARY STATUS .

FOLLOW THE GIVEN STEPS :
1. GO TO ZALGO TEXT GENRATOR TO GO CLICK HERE  .
2.  TYPE YOUR STATUS IN TEXT BOX .
3. COPY THE SCARRY TEXT FROM THE BELOW BOX AND PASTE IN YOUR FB STATUS AND UPDATE IT.

NOTE: ALPHABETS MAY NOT BE CLEARLY VISIBLE.
(Note: Few Alphabets May Not Be
Visible)NO

How to Create Scary Facebook Status

Want to Make a Scary Facebook Status to Frightened You’re Friends. It Is Very Easy To Update a Scary Status.
Follow the Given Steps:
1. Go To Zalgo Text Generator To Go Click Here .
2. Type Your Status In Text Box.
3. Copy The Scary Status From Text Box And Paste In Your Status Box and Update Your Status.
(Note: Few Alphabets May Not Be
Visible)
- See more at: http://hac4istan.blogspot.in/2014/06/how-to-create-scary-facebook-status.html#sthash.hLFKDxl5.dpu

How to Create Scary Facebook Status

Want to Make a Scary Facebook Status to Frightened You’re Friends. It Is Very Easy To Update a Scary Status.
Follow the Given Steps:
1. Go To Zalgo Text Generator To Go Click Here .
2. Type Your Status In Text Box.
3. Copy The Scary Status From Text Box And Paste In Your Status Box and Update Your Status.
(Note: Few Alphabets May Not Be
Visible)
- See more at: http://hac4istan.blogspot.in/2014/06/how-to-create-scary-facebook-status.html#sthash.hLFKDxl5.dpuf
Want to Make a Scary Facebook Status to Frightened You’re Friends. It Is Very Easy To Update a Scary Status. - See more at: http://hac4istan.blogspot.in/2014/06/how-to-create-scary-facebook-status.html#sthash.hLFKDxl5.dpuf
Want to Make a Scary Facebook Status to Frightened You’re Friends. It Is Very Easy To Update a Scary Status.
Follow the Given Steps:
1. Go To Zalgo Text Generator To Go Click Here .
2. Type Your Status In Text Box.
3. Copy The Scary Status From Text Box And Paste In Your Status Box and Update Your Status.
(Note: Few Alphabets May Not Be
Visible)
- See more at: http://hac4istan.blogspot.in/2014/06/how-to-create-scary-facebook-status.html#sthash.hLFKDxl5.dpuf
Want to Make a Scary Facebook Status to Frightened You’re Friends. It Is Very Easy To Update a Scary Status.
Follow the Given Steps:
1. Go To Zalgo Text Generator To Go Click Here .
2. Type Your Status In Text Box.
3. Copy The Scary Status From Text Box And Paste In Your Status Box and Update Your Status.
(Note: Few Alphabets May Not Be
Visible)
- See more at: http://hac4istan.blogspot.in/2014/06/how-to-create-scary-facebook-status.html#sthash.hLFKDxl5.dpuf
Want to Make a Scary Facebook Status to Frightened You’re Friends. It Is Very Easy To Update a Scary Status.
Follow the Given Steps:
1. Go To Zalgo Text Generator To Go Click Here .
2. Type Your Status In Text Box.
3. Copy The Scary Status From Text Box And Paste In Your Status Box and Update Your Status.
(Note: Few Alphabets May Not Be
Visible)
- See more at: http://hac4istan.blogspot.in/2014/06/how-to-create-scary-facebook-status.html#sthash.hLFKDxl5.dpuf
Want to Make a Scary Facebook Status to Frightened You’re Friends. It Is Very Easy To Update a Scary Status.
Follow the Given Steps:
1. Go To Zalgo Text Generator To Go Click Here .
2. Type Your Status In Text Box.
3. Copy The Scary Status From Text Box And Paste In Your Status Box and Update Your Status.
(Note: Few Alphabets May Not Be
Visible)
- See more at: http://hac4istan.blogspot.in/2014/06/how-to-create-scary-facebook-status.html#sthash.hLFKDxl5.dpuf
Want to Make a Scary Facebook Status to Frightened You’re Friends. It Is Very Easy To Update a Scary Status.
Follow the Given Steps:
1. Go To Zalgo Text Generator To Go Click Here .
2. Type Your Status In Text Box.
3. Copy The Scary Status From Text Box And Paste In Your Status Box and Update Your Status.
(Note: Few Alphabets May Not Be
Visible)
- See more at: http://hac4istan.blogspot.in/2014/06/how-to-create-scary-facebook-status.html#sthash.hLFKDxl5.dpuf
Want to Make a Scary Facebook Status to Frightened You’re Friends. It Is Very Easy To Update a Scary Status.
Follow the Given Steps:
1. Go To Zalgo Text Generator To Go Click Here .
2. Type Your Status In Text Box.
3. Copy The Scary Status From Text Box And Paste In Your Status Box and Update Your Status.
(Note: Few Alphabets May Not Be
Visible)
- See more at: http://hac4istan.blogspot.in/2014/06/how-to-create-scary-facebook-status.html#sthash.hLFKDxl5.dpuf
Want to Make a Scary Facebook Status to Frightened You’re Friends. It Is Very Easy To Update a Scary Status.
Follow the Given Steps:
1. Go To Zalgo Text Generator To Go Click Here .
2. Type Your Status In Text Box.
3. Copy The Scary Status From Text Box And Paste In Your Status Box and Update Your Status.
(Note: Few Alphabets May Not Be
Visible)
- See more at: http://hac4istan.blogspot.in/2014/06/how-to-create-scary-facebook-status.html#sthash.hLFKDxl5.dpuf
Want to Make a Scary Facebook Status to Frightened You’re Friends. It Is Very Easy To Update a Scary Status.
Follow the Given Steps:
1. Go To Zalgo Text Generator To Go Click Here .
2. Type Your Status In Text Box.
3. Copy The Scary Status From Text Box And Paste In Your Status Box and Update Your Status.
(Note: Few Alphabets May Not Be
Visible)
- See more at: http://hac4istan.blogspot.in/2014/06/how-to-create-scary-facebook-status.html#sthash.hLFKDxl5.dpuf
Want to Make a Scary Facebook Status to Frightened You’re Friends. It Is Very Easy To Update a Scary Status.
Follow the Given Steps:
1. Go To Zalgo Text Generator To Go Click Here .
2. Type Your Status In Text Box.
3. Copy The Scary Status From Text Box And Paste In Your Status Box and Update Your Status.
(Note: Few Alphabets May Not Be
Visible)
- See more at: http://hac4istan.blogspot.in/2014/06/how-to-create-scary-facebook-status.html#sthash.hLFKDxl5.dpuf
Want to Make a Scary Facebook Status to Frightened You’re Friends. It Is Very Easy To Update a Scary Status.
Follow the Given Steps:
1. Go To Zalgo Text Generator To Go Click Here .
2. Type Your Status In Text Box.
3. Copy The Scary Status From Text Box And Paste In Your Status Box and Update Your Status.
(Note: Few Alphabets May Not Be
Visible)
- See more at: http://hac4istan.blogspot.in/2014/06/how-to-create-scary-facebook-status.html#sthash.hLFKDxl5.dpuf
Want to Make a Scary Facebook Status to Frightened You’re Friends. It Is Very Easy To Update a Scary Status.
Follow the Given Steps:
1. Go To Zalgo Text Generator To Go Click Here .
2. Type Your Status In Text Box.
3. Copy The Scary Status From Text Box And Paste In Your Status Box and Update Your Status.
(Note: Few Alphabets May Not Be
Visible)
- See more at: http://hac4istan.blogspot.in/2014/06/how-to-create-scary-facebook-status.html#sthash.hLFKDxl5.dpuf
Want to Make a Scary Facebook Status to Frightened You’re Friends. It Is Very Easy To Update a Scary Status.
Follow the Given Steps:
1. Go To Zalgo Text Generator To Go Click Here .
2. Type Your Status In Text Box.
3. Copy The Scary Status From Text Box And Paste In Your Status Box and Update Your Status.
(Note: Few Alphabets May Not Be
Visible)
- See more at: http://hac4istan.blogspot.in/2014/06/how-to-create-scary-facebook-status.html#sthash.hLFKDxl5.dpuf
Follow the Given Steps:
1. Go To Zalgo Text Generator To Go Click Here .
2. Type Your Status In Text Box.
3. Copy The Scary Status From Text Box And Paste In Your Status Box and Update Your Status.
- See more at: http://hac4istan.blogspot.in/2014/06/how-to-create-scary-facebook-status.html#sthash.hLFKDxl5.dpu
Follow the Given Steps:
1. Go To Zalgo Text Generator To Go Click Here .
2. Type Your Status In Text Box.
3. Copy The Scary Status From Text Box And Paste In Your Status Box and Update Your Status.
- See more at: http://hac4istan.blogspot.in/2014/06/how-to-create-scary-facebook-status.html#sthash.hLFKDxl5.dpuf
Follow the Given Steps:
1. Go To Zalgo Text Generator To Go Click Here .
2. Type Your Status In Text Box.
3. Copy The Scary Status From Text Box And Paste In Your Status Box and Update Your Status.
- See more at: http://hac4istan.blogspot.in/2014/06/how-to-create-scary-facebook-status.html#sthash.hLFKDxl5.dpuf

create your own fake fb 'update status via' any device !

Have you ever seen that some people on Facebook update their status with some device that is shown on the top of the status!

For example:

What if you don't have your favourite device and still you want to show off to your friends?
So, now We are posting a trick to create your own desired fake device to update your Facebook status via it. I hope you will like the Trick!!
Method:
Step 1 - First, Goto http://developers.facebook.com/apps
Step 2 - Now, Click On "Register As a Developer"
Step 3 - From there, Click On "Create New App"
Step 4 - And A Dailog Box Will Be Opened!
Step 5 - Fill The "APP NAME" With Your Desired Name And Leave Other Boxes blank, and Then Click On 'Continue'.
Step 6 - Fill Correctly the Required Captcha.
Step 7 - Important SandBoX Mode - Click On Disabled!!
Step 8 - Finally, Click On "SaVe Changes"
Step 9 - Then Copy Your App Id that you have created And replace it Here with the Red text:
https://m.facebook.com/dialog/feed?_path=feed&app_id= enter your app id here &redirect_uri=https://www.facebook.com

Done!! Now you have successfully created your own fake status update device! Now, just go to the url created in 'Step 9' and Update Your Status Via Your Own Device :)
Some Popular Fake Status Update Device are:
1. Samsung Galaxy Note 3
2. Sony Xperia Z
3. Titanic
4. McDonalds
Feel free to comment below :)

Thursday, 12 June 2014

Why you need to Download a Copy of facebook data.there are many answer of this question.there will be absolutely many memories on facebook with your friends and you want to keep safe them.one day my friend ask to me can i download all the data from my facebook account then i search a lot about it and find this method. facebook is trustable site,but keep your data in your computer this is very good option.after download you can view you data offline.
Data are not only images with your friend and videos but also all your conversation with your friends,your profile Information,joined groups,likes,events,pages and more you can view offline. Now i am showing you a tutorial of “Download a copy of facebook data”.


How To Download a Copy of your Facebook Data


What  are the benefits of Downloading facebook data?

  • You can save your all images and view offline.
  • You can view you your all conversation with your friends.
  • You can view videos if you have any video in your account offline.
  • You can view all your profile information like pages you have joined,groups.
  • You can see your security information.
  • You can see your friend list.

Step by step tutorial:-

Step 1.Go to www.facebook.com and login to facebook account.
Step 2. See a gear icone on left side you screen with profile name.showing below in image:-

facebook gear icon

Step 3. Click on Gear icon then a drop downlist will show,click on setting.

facebook account setting

Step 4.Now you can see all the general settings.below the general setting,you see “Download a copy of  your facebook data”.click on that link.

Download copy of facebook data option

Step 5. After last step done it will redirect you to a downloading page. Click on “Download Archive” button.see in image:-
Download archive button
Step 6.in the next step it will ask you your  facebook account password.fill the password.showing in image:- 
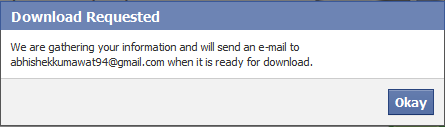
Step 7. After entering the password Click on submit.now show a message of  Download requested.and a mail is sent to your email id.see in image:-
Download request
Step 8.Check your email id that is attached with your facebook account.you got a mail on on your email a id.and click on a blue link that is in red box  .see  below in image for more information:- 
facebook mail

Step 9.  After Click on that link it will redirect you to downloading page.in this page you can see a button with start my archive click on that button.
Start my archive button


“Now you have done.this is the method of downloading facebook Data.if any step you facing any problem then comment below.and if you learing something from this article than share this method to social sites.”
You can also see:-How To Delete Facebook Account Permanently


HOW TO DELETE FB ACC. PERMANENTLY

If you want to delete facebook account then this is a right place to increase your knowledge. Facebook  is largest  social website in world. There are more than one billion users on facebook. Large  number of group and pages in facebook. Some peoples think facebook is not useful website and want to delete a facebook account.many peoples don’t know how to delete a facebook account.Because in facebook account setting there is no option of delete a facebook account.there is option of deactivate facebook account.
But there is difference between deactivating facebook account and delete a facebook account.if you deactivate a facebook account than you can activate your account any time, but if delete a facebook account that you cant reactivate the account. I am showing  a tutorial  “how to delete a facebook account permanently.”

How To Delete Facebook Account Permanantly

Before deleting a facebook account if you want to download facebook data like videos,photos etc. then you can also save your data that is uploaded on facebook.

Must Read:-How To Download a Copy of Facebook Data

Steps for deleting a facebook account


Step 1.First go to https://www.facebook.com/help/delete_account‎ and login your facebook account.

Step 2. After login it will ask you to deleting the account.click on “delete my account”.

delete facebook account

Step 3. In the next step it will ask you your facebook id password,and for typing a captcha,type your password and  captcha and click on okay.

Enter Password For Deleting Facebook Account

Step 4.in this last step it will show a message in a window,your account will be deleted in 14 days.press ok button to continue.

Confirm Deletion of facebook account

You can reactivate your account within 14 days if u want,otherwise facebook will delete your acoount Permanently after 14 days.

This is the method of deleting a facebook account.if u delete your account and want to recover again before the limited time then follow below procedure for canceling that account.

Step 1. Go to www.facebook.com and login to your account.
Step 2. After login a message will show in a small box.showing in image.


Step 3. Click on “Cancel Deletion” .after click on that a message will show “you have canceled your deletion  request.Click on “Reactivate Account”.


Step 4. Now it will redirect you to your facebook “News Feed”.

I hope this tutorial of "Deleting  facebook account" will be helpful for you.